Cauliflower Pizza Crust

IMG_7991.JPG

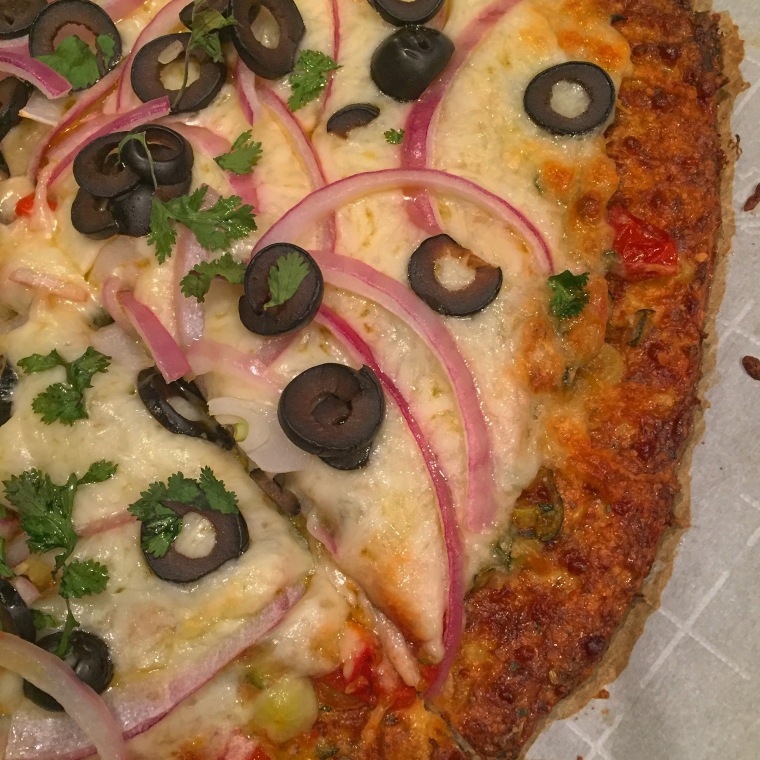
This is only my second attempt at cauliflower pizza, and this recipe will become a weekend staple in my home. The crust is fairly light and crunchy, the veggie spread is savory, and the toppings were a perfect pairing. I’ve already started thinking about other topping combinations and think that next I’m going to try sun dried tomatoes, spinach and artichoke hearts. My stomach is growling simply at the thought of it! The recipe you’ll find below is for the crust and veggie spread. I use the veggie spread as a sauce of sorts so if you would rather have sauce, skip the veggie spread ingredients and directions. Finish it off with our favorite toppings, and you’ll have a delicious and healthy pizza! I got this recipe from a magazine put out by my local grocery store, Ralphs.

Serves: 8 slices     Time: 1 hour     Calories: 146/slice (this does not count toppings)

Ingredients for Crust:

  • 1 large head of cauliflower
  • 1/2 cup of shredded pizza blend cheese
  • 1/4 cup of grated Parmesan cheese
  • 2 large eggs, beaten
  • 1/2 tsp salt
  • 1/2 tsp onion powder
  • 1/2 tsp Italian seasoning
  • any toppings you would like for your pizza. We used sliced red onion, black olives and cilantro.

Ingredients for Veggie Spread:

  • 2 tbsp cooking oil, I used canola
  • 3 medium/large zucchinis, shredded
  • 1 carton of grape tomatoes, sliced
  • 4 cloves of garlic thinly sliced
  • salt and pepper to taste

Directions:

  1. Preheat oven to 400 degrees Fahrenheit, and line a baking sheet or pizza stone with parchment paper
  2. If you have a food processor, pulse the florets of cauliflower until finely chopped.
  3. If you don’t have a food processor, use a cheese grater to “rice” the cauliflower florets.
  4. Place the chopped/riced cauliflower into a microwave safe bowl and microwave on high for 3 minutes. Once it is cool enough to handle, squeeze out moisture from the cauliflower with a clean towel. It will essentially make a ball of cauliflower.
  5. Transfer the “moisture-less” cauliflower to a large mixing bowl and stir in the pizza blend cheese, Parmesan, eggs, salt, onion powder and Italian seasoning.
  6. Spread this mixture onto your prepared baking sheet or pizza stone in a thin, 12-inch circle.
  7. Bake for about 30 minutes until the crust is firm and crisp at the edges.
  8. If you plan to use veggie spread instead of sauce, start preparing this while the crust is cooking (directions found below).
  9. Top with all your favorites and bake again until your toppings are melted and/or properly heated through.

Directions for Veggie Spread:

  1. Using a cheese grater, shred your zucchini.
  2. Heat 2 tbsp of cooking oil over medium-high and add the shredded zucchini, stirring frequently.
  3. After about 3 minutes of cooking the zucchini add the sliced grape tomatoes. Note, the juices from the tomatoes will  make a paste like spread with the zucchinis. Cook for an additional 2 minutes until tomatoes start to wilt.
  4. Add in the sliced garlic and cook for an additional 30 seconds until the fragrant.
  5. Season with salt and pepper to taste.
  6. Remove from heat and spread on your crust as if it was sauce after the first 30-minute bake.
  7. Top with your favorites and enjoy!

* Photo is an original belonging to me

*Recipe adapted from Ralphs


Baked Orange Chicken

IMG_7983.jpg

Every few months I get a hankering for breaded, fried, and saucy chicken nuggets. That’s really just a round about way of saying I am addicted to orange chicken. I finally tried recreating this recipe at home. While it can be a treat to order take-out, we live on a pretty tight budget. I also love experimenting with recipes I love, so it was a lot of fun to play with these ingredients. These morsels are perfectly tangy and sweet with a perfect crunch. The best part, these babies are oven baked! No hot oil is required for this recipe saving your skin from oil burns and arteries from clogging. You are all very welcome 🙂 I must give credit to Just a Taste whose original recipe was adapted to form this one.

Serves: 6     Time: 30 minutes     Calories: 623/serving

Ingredients:

  • 4 boneless, skinless chicken breasts
  • 1 cup of all purpose flour
  • a pinch of salt and pepper
  • 1 cup of milk
  • 3 cups of Panko breadcrumbs
  • 1 tsp sesame oil
  • 2 tsp cooking oil, I used canola
  • 2-3 tbsp minced garlic (Refine this to your tastes. I love garlic so I went for 3)
  • 2 tsp fresh grated ginger
  • 1/4 cup hoisin sauce.
  • 1 (18oz) jar of orange marmalade
  • 2 tbsp soy sauce, I used “lite” soy sauce
  • 1-2 tsp crushed red pepper flakes (Refine this to your tastes, we like spicy so I used 2. If you don’t like spice leave this ingredient out).
  • sesame seeds for sprinkling

Directions:

  1. Preheat oven to 450 and line a baking sheet with foil.
  2. Cut up chicken into bite size pieces
  3. In a large bowl combine flour, salt, and pepper. Put the chicken into the bowl and toss it to coat the chicken.
  4. Pour milk into a small bowl and the Panko crumbs to a large bowl or plate.
  5. Working one piece of chicken at a time, dredge chicken in  milk then roll it in the Panko breadcrumbs. Once coated in breadcrumbs place each piece onto the foil lined baking sheet.
  6. Bake the chicken for 10 minutes, flip them, then bake for an additional 10 minutes. (You’ll bake for 20 minutes or until fully cooked and nicely browned).
  7. While the chicken is baking, heat sesame and cooking oil in a small saucepan over low heat. Add the garlic and ginger stirring for a minute or two until fragrant and golden.
  8. Add the hoisin, marmalade, soy sauce and crushed pepper flakes to the garlic/ginger mixture. Stir frequently while cooking over low heat for about 5 minutes.
  9. If you are planning to have left overs, take only the chicken you plan to eat and dunk them in the sauce. Let the other chicken pieces cool and put them in an airtight container and then in the fridge. Store extra sauce in a separate container. When you plan to eat the left overs, bake the chicken at 450 degrees F in the oven and heat up the sauce. Baking the chicken will ensure that the breadcrumbs become crispy once more.
  10. If you are planning to eat all of the chicken pieces, put the chicken in a large bowl and pour the sauce over it. Turn over the chicken to make sure all pieces are coated.
  11. Sprinkle with sesame seeds and enjoy!

*Photo is an original belonging to me

*Recipe adapted from Just a Taste


Baked Garlic Honey Pork Chops


IMG_7982

I won’t lie, pork chops scare me. You walk a fine line between nice tender meat or a dry jerky like patty. Every once in a while Perry will ask for something other than beef or chicken. He will suggest I try my hand at pork. Since he doesn’t ask for it too often I oblige. This is only one of two pork chop recipes on this blog right now. I hope to diversify my catalogue of recipes, and this is a delightfully delicious start! These chops are tangy, sweet and savory. The combination of flavors is fabulous and I’m willing to bet that you’ll be lapping up the sauce with with whatever side you pair these chops up with. I have to give credit to the blog who inspired me to try this recipe. If you like these chops check out other tasty recipes on Mama Hen’s Kitchen.

Serves: 4      Time: 40-50 minutes       Calories: 186/pork chop

Ingredients:

  • (4) 1 inch thick boneless pork chops (size matters here, friends. Otherwise you may end up with dry chops)
  • Salt and pepper to season the chops
  • 2 tbsp cooking oil (I used canola)
  • 1/4 cup of honey
  • 2 tbsp lemon juice
  • 3 tbsp minced garlic
  • 2 tsp soy sauce
  • (Optional) If you like spice throw in some red chili flakes to taste

Directions:

  1. Preheat oven to 350 degrees Fahrenheit.
  2. Season the pork with salt and pepper on both sides.
  3. Heat the oil in a pan over medium heat. Brown the pork chops (about 3 minutes per side).
  4. Set the pork chops in a baking dish.
  5. Whisk together the remaining ingredients. Be sure that the honey is well combined.
  6. Brush this mixture over the pork chops on both sides. Pour the remaining sauce all over the pork.
  7. Cover the baking dish with foil and bake until the internal temperature reaches your favored tenderness. This is approximately 30-40 minutes. For your reference Medium-Rare (145F-150F), Medium (150F-155F), Medium-Well (155F-160F), Well (160F).
  8. Bathe these babies with sauce before serving, and plate with your favorite sides!
  9. Enjoy 🙂

*Photo is an original belonging to me.

*Recipe is adapted from Mama Hen’s Kitchen